

I-Tip hair extensions are a popular choice for anyone looking to add length, volume, or fullness without using heat or glue. These extensions are installed using small beads that secure the hair strands, making them a flexible and natural-looking option.
While I-Tip extensions offer great styling versatility and can blend seamlessly with natural hair, they also require proper installation and maintenance to avoid damage. Understanding how they work, how long they last, and who they’re best suited for can help you decide if I-Tip hair extensions are the right choice for your hair goals.
What Is an I-Tip Hair Extension?
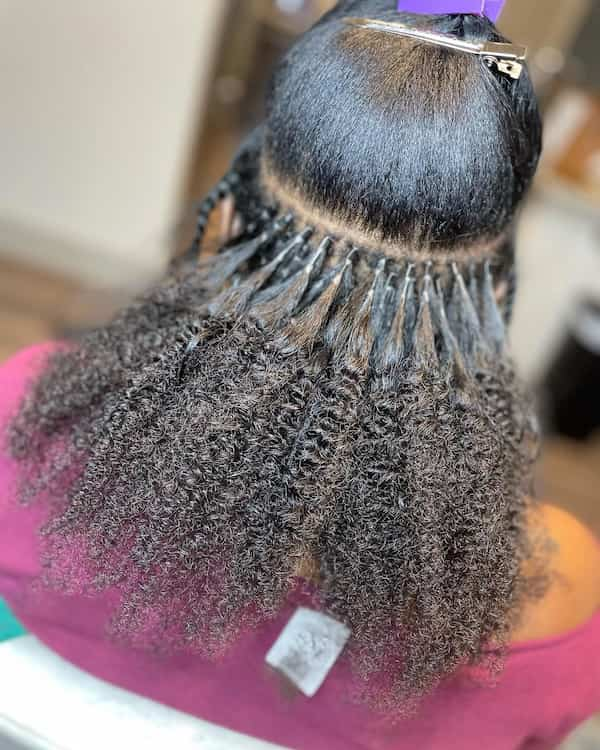
I-tip hair extensions, also known as microbead or micro-link extensions, are a type of semi-permanent hair extension that attaches to natural hair using small silicone-lined beads called microbeads.
Each extension strand is pre-tipped and grouped into small sections. During installation, the stylist slides a microbead onto a small section of your natural hair, inserts the I-tip strand into the bead, and secures it using a special pair of pliers.
Unlike many other extension methods, I-tip extensions require no heat, glue, or chemicals. This makes them one of the most natural-looking and low-damage extension options available. Because no adhesive is involved, the risk of hair breakage and scalp irritation is significantly reduced.
I-tip extensions blend seamlessly with natural hair and move freely, giving a very realistic appearance. A popular alternative to this method is the MicroLink hair extension, which uses a similar bead-based technique.
How Long Do I-Tip Hair Extensions Last?
With proper care and regular maintenance, I-tip hair extensions can last up to six months while installed. Maintenance appointments are typically required every six to eight weeks as your natural hair grows.
During maintenance visits, a stylist tightens or repositions beads that have shifted downward to prevent slipping or uneven weight distribution. This step is crucial to avoid tension on the natural hair.
After about six months, the microbeads themselves may need replacement, as frequent washing and styling can weaken their grip. However, the hair used in I-tip extensions often lasts much longer. High-quality human hair can be reused for up to a year or more with proper care.
I-Tip Hair Extensions Cost
I-tip hair extensions are a premium option and tend to be more expensive than many other extension methods.
Installation alone typically costs between $150 and $500, depending on location, stylist experience, and hair density. This does not include the cost of the hair itself.
Human hair bundles usually come in packs of 50 pieces, with approximately 20 strands per piece. A full head generally requires three to four bundles, each costing between $75 and $100. Synthetic hair is cheaper but cannot be heat-styled or colored.
When factoring in installation, hair purchase, and ongoing maintenance, total costs can reach several thousand dollars. Monthly or bi-monthly maintenance appointments can cost around $200.
I-Tip Hair Extensions Pros and Cons
Before choosing I-tip extensions, it’s important to understand both their advantages and drawbacks.
Pros
I-tip extensions are thin and lightweight, making them ideal for people with fine or fragile hair. Because the hair is applied in small sections, it does not place excessive stress on the scalp.
They are non-damaging when installed and maintained correctly. No glue, heat, or chemicals are used, allowing natural hair to remain intact.
The microbeads are extremely discreet and come in multiple colors, making them virtually invisible even in lighter or color-treated hair.
Cons
Maintenance can be complex. You must brush carefully to avoid loosening beads, and improper brushing can pull extensions out.
Regular salon visits are required as hair grows, which increases long-term costs.
I-tip extensions are expensive compared to many other semi-permanent methods, especially when using high-quality human hair.
I-Tip Hair Extensions Application
Although the application process is straightforward, I-tip hair extensions are best installed by a trained professional. Proper placement requires precision and visibility that is difficult to achieve alone.
DIY installation is possible with an I-tip kit, which usually includes pliers and bead tools and can cost as little as $15. However, improper placement can cause uneven tension, slipping, or damage.
If attempting self-installation, it’s recommended to practice on a mannequin head and watch professional tutorials before applying extensions to your own hair.
Are I-Tip Hair Extensions Damaging?
I-tip hair extensions are among the least damaging semi-permanent extensions available. Since they do not rely on glue, heat, or chemicals, they preserve the integrity of natural hair.
Damage typically occurs only when maintenance is neglected. Beads that slide too far down the hair shaft can pull on natural hair and cause breakage if not repositioned.
Routine maintenance ensures even weight distribution and prevents stress on the hair follicles.
Conclusion
Choosing the right hair extension method is one of the most important decisions in the extension process. From hair type and quality to installation technique and maintenance requirements, each factor plays a role in long-term results.
I-tip hair extensions offer a natural look, excellent durability, and minimal damage when properly maintained. While they are more expensive and require professional upkeep, they remain one of the most reliable and realistic extension methods available.
This guide covers everything you need to know about I-tip hair extensions, including how they work, how long they last, how much they cost, and whether they’re right for you.